
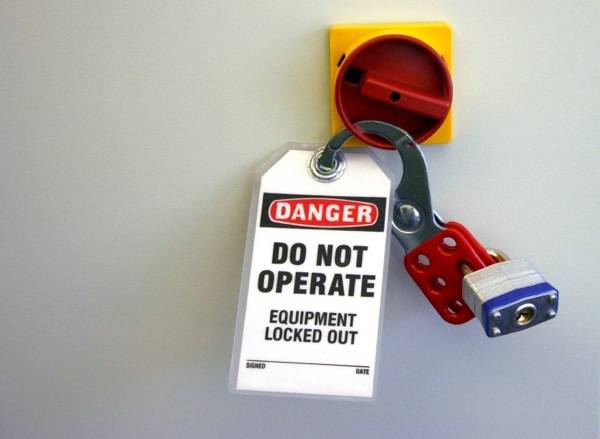
Safety in the work environment is a major concern in any industry. The lockout-tagout steps is a safety procedure to ensure that machinery cannot be switched on during important servicing and maintenance work. Energy sources are isolated and rendered inoperative before the work on the machinery can begin. Once the source is locked out, a tag is placed on it so that all can see who the worker is who locked it out. This worker will be the only one with the key that is able to unlock it, ensuring that no other person is able to accidently start the machine.
The following looks at the basic steps that must be taken to ensure a safe lockout-tagout.
Step 1: Identify and detail procedures
The first step in a lockout-tagout is to ensure that the right machine is identified, including its location. The correct process to shut down the equipment then needs to be identified. This procedure should be written down step by step. All of the energy sources leading to the equipment should be considered. It is important to be specific in your writing.
Step 2: Notify employees
The employees that will be affected by the maintenance should then be notified of the maintenance. They should be informed as to how long the process will take and when it will begin.
Step 3: Shut down the equipment
The next step is to completely shut down the equipment. The entire shutdown procedure should be written down and followed perfectly. This includes each shutdown step.
Step 4: Primary energy source to be shutdown
Even though this is a simple step that should be obvious, it is crucial that every step be double checked. It is a mistake to assume that the power or input source was properly switched off. The steps to perform a correct disconnection of the energy source should be written down in detail.
Step 5: Secondary sources
Once the main power source has been disconnected, it is important to remember that there may be secondary sources of residual energy that still need to be addresses. This includes trapped heat, tension in springs and fumes that must first be vented. Identify the methods to remove the energy or pressure. Lastly, consider other possible hazards such as equipment that must be secured.
Step 6: Verify the entire lockout-tagout
After you have ensured that all primary and possible secondary sources of energy have been properly disconnected and dealt with, try and start the machine to verify that is in fact completely inoperable. Before beginning the test, make sure that there is no worker in a hazardous position in case the machine is still operable. Once the test is successful, put all of the switches back into an “off” position. At this point, a lockout device should be attached along with a tagout device. This is to ensure that no one is able to attempt to start the machine.
Step 7: Deal with shift changes
As the maintenance may happen over more than one shift, the machine should remain in a lockout-tagout condition through shift changes. New shift workers should be aware of the lockout situation. Furthermore, if an individual is responsible for the lockout-tagout, the new person responsible should be present with the first individual when the tags and locks are switched.
Step 8: Bring the machine back in operation
Once all of the maintenance and service work is completed, the lockout-tagout can be removed and the machine or equipment can be brought back into operation. The procedure to make the machine operable again should be as detailed as the shutdown procedure. This includes the sequence that it should be done in.
If these steps are properly followed, safe maintenance and service can be done without putting any worker in harm’s way. Let the process take as long as it needs to and do not rush it.


Comments